Sunday, January 30, 2011

From snow and boots to sunshine and shorts!

What a difference a couple of hours makes. On our way home, we went from a temperature of 34 degrees in Maryland to almost 60 degrees in Georgia. I am definitely a Southern girl. I love the warm weather. Yesterday, Jim and I took a little jaunt in the car, to finish a "book" on CD that we had started on our way up to Bethesda; Marking by Robin Cook. It was a riveting story and we wanted to find out the ending.

Driving down Main Street, Acworth, we departed from the road to investigate others. We wound up on Lake Allatoona and the "Battlefield of Allatoona". Never having been there before, we were delighted to see families in shorts and tank tops high on the hill in front of the lake shore. There were paths for bikers and hikers. Since I had brought my camera, thinking that I would get the barn shot that I had missed on the trip to Maryland, I shot some photos.

Jimmy on the trail


Blessings to you all!

Saturday, January 29, 2011

Home again!

This week was filled with the bitter sweet going to my old home town of Bethesda, which is probably listed as a city now. It has been over thirty years ago that I lived there and since I was never a fan of the overcast and cold weather, I couldn't wait to move to some place else.

The occasion was my sister's funeral. She had "died" on New Year's Eve officially. But when the EMT took here away, they revived her. And although she remained in a coma for several weeks, she was listed as living. What a strange situation that is for the family and close ones. For her husband, especially.

I had mourned her passing the first time I had the call that she had died. So this was really a formality, the funeral service. If you have ever gone to an open casket service, you know how uncomfortable that can be. At least it was for me. I did not want to remember her in a casket. I remember her alive and well and making me laugh. But it was her husband's wish for those who remember her so sick and ailing, that he show them what she looked like at peace.

The memorial service was headed by Father Valentine, an Irish priest that my sister loved.
Eulogies were offered by my oldest brother, Jimmy, and two of Phil's siblings.

The weather was appropriate for a burial; cold, windy and snowy. But it was brief and sweet.

We all gathered to get Phil's address (Martha's husband) as we were to meet up for food and drink at his house. Along the way it began to "spit" snow. We had heard that the Washington, D.C. area was prepping their snow plows for 8 to 10 inches of snow. But it was scheduled for after 5 PM so we thought we had time to get back before the roads got really bad. And, hey, this is north, and they are used to this stuff.

At 4:15pm, we looked out onto Phil's deck and saw that it had started to sleet. We stayed only about 15 minutes and then decided it would be best for us to make it back to the hotel. That would take about 25 minutes in good weather. Lucky for us, we made it into Bethesda, where there was quite a gridlock. Right at our turn to Hilton Garden Inn, there was a stalled bus, which caused a stop of all traffic going to that destination. It wasn't long before we inched along and finally arrived safely. On the morning news the next day, we learned that not a few motorists were stranded for up to 13 hours.


Park Lawn Memorial Park


Friday, January 21, 2011

Yesterday

After having a nice lunch at Red Lobster in Canton with my good friend, Barbara, I set out to get some new photos. She lives in the country where there are barns and lovely hills and valleys. Barb had to run some errands, so I was on my own. Now on these old country roads, there is no where to stop and park your car. If you move to the right, there is a chance of getting stuck in a ditch. So I pretty much did as my Flickr friend, Hootnonny does, and just shot out of my window, checking my rear view mirror to make sure no one was coming up behind me. Naturally, with Murphy's Law, on a usually deserted road, someone is behind me. Oh well, that photo was not meant to be. Onto the next scene.

I did happen to get a few nice photos that will sustain my creative juices for this week. And will post them on Flickr when I process them. Here is one:


I was imaging that this is where I was living. What a respite from the busyness of the world. So serene and peaceful.

Blessings and Peace to you all!

Wednesday, January 19, 2011

Rainy Tuesday

Not much going on today. Being my day off, I slept until 10:30 am. I haven't done that in a while. Hope  I can sleep tonight. I shouldn't have had that extra coffee today.

Had to change out the dog food because 2 of my dogs got very sick on the bag we got recently. I dumped it all out in the garbage and went to Aldi to get a fresh bag of their brand. Lot of wash to do because of sick dogs. They are okay now. I am watching over them.

Kim Klassen's lesson today was awesome. She showed how to use the healing brush on a separate layer and changing a photo to black and white. She even gave us a hint on changing the opacity to bring back some of the color, thus creating a vintage effect.


My Homework

Finished "The Moth" by Catherine Cookson. I have "The Parson's Daughter" to start next. Anyone have any favorite authors?

Has anyone noticed that the size of Nutty Buddies has shrunk?

Tuesday, January 18, 2011

Let's make a photo texture!

There are a lot of really good free textures online to download. Two come to mind right away: http://www.kimklassencafe.com/ and http://shadowhousecreations.blogspot.com/

I don't purport to be anything but an amateur when it comes to photography and Photo Shop Elements. But the derivation of amateur is the verb amare, which is "to love".  And I love creating on PSE.

This is my method for making a texture.

First of all, you need to download some good brushes to use on your texture. There are a number of resources but one of my favorites is: http://www.deviantart.com/
In the search box, type in something like "cloud brushes" or "grunge brushes". There are just so many to choose from, so pick a few and let's get started.

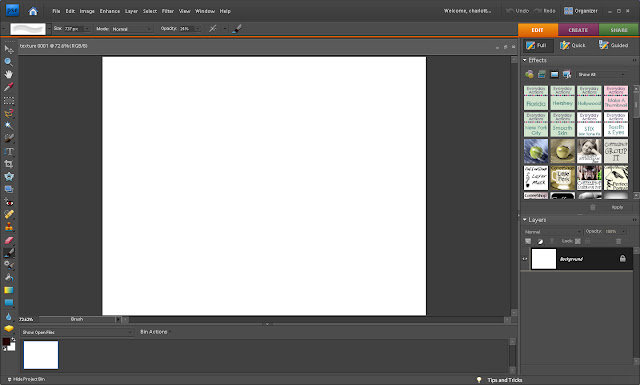
Open up PSE and file>new>blank file. Change the size to inches>10inches wide X 8 inches high. Resolution: 100 pixels, and choose RGB color. Then click okay. Your screen will look like this:


Under "edit" pull down menu >fill layer>click on the foreground color box to bring up the color picker. I like to choose a medium saturated neutral color. This one's code is #2c0909 but you can choose what you like. Be sure to put a number in for the "opacity". I am choosing 50%.


 Click Okay. Here it is:


Now here comes the creative part. Go to your brushes and choose one to start with. I am choosing a grunge border brush by ro_stock. I started by putting a corner brush, where else, in the corner. :o)


The next brush I choose from the same set from ro_stock ( I think I got them on deviant art) and increase the size (short cut-use the bracket keys, next to the "p" and the left one makes your brush smaller and the right one makes it bigger. I am making mine to fit the width of the bottom of my "picture" :


My next brush stroke will be a little different because the orientation is not what I want. But we can fix that. On your layers palette, click on the "Create a new layer" icon. Now choose your brush and click it onto the middle of the picture like so:


Now click on the move tool and grab one of the corners. If you move your mouse around, you will see a circle of arrows, click on that to turn your brush. When you have your brush positioned where you want it, (by moving the middle circle), you can resize by pulling on either end to fit your picture. Then check the green check mark.


I am adding one more brush to fill in the top left. I think you can do that just fine by now.

If you would like to add some text, now is the time to do it. Choose a nice font that you like and create a new layer. Type a word or phrase anywhere on your layer and then click on the move tool. This allows you to not only move it around on your layer, but also to stretch it and make it bigger or taller.


I added a couple more words using the same method and then decided to add a cool feather brush that I found on deviant art. Here is my final product:


Final Texture
I hope that this is clear for you to follow along. Please email me if you need assistance:
charlotteinkennesaw@gmail.com or just leave a comment.

Blessings to you all!


Monday, January 17, 2011

Monday, Monday

This turned out to be a busier day than I had planned. I was going to write a tutorial on making a texture, for fun. I am surely not an expert, but I just wanted to try and show what you can do on PSE.

Since Katie was off today and is starting her classes tomorrow, we decided to go to lunch. And not just any old run of the mill lunch places. :o) We went to H-Mart. Now H-Mart is a mostly Asian supermarket, specializing in all kinds of exotic items. So it was an adventure.
In the front of the store, is a kind of food court: Korean, Japanese, Mandarin, Sushi, and Vietnamese. We were both in the mood for Korean, walked up and placed our order. This was definitely not fast food. They prepare each dish fresh. It was hard to wait as we were already past lunch time and were starving. Finally my dish was called. But Katie had to wait about 5-10 minutes for hers. Here is what I got:
My Korean Sampler
In the upper left was a special seaweed soup. Right beneath is Kim Chi, a kind of pickled cabbage. The top Middle, a nice ginger slaw. To the right is chicken in a spicy sauce. Below, rice, of course. And the bottom middle is a vegetable fritter. I give good marks for everything but the seaweed soup. It may have been wonderful to some, but not my taste.

Here is Katie's dish:


Bee Bim Bop
 This is a combination of vegetables, beef and rice, topped with a fried egg. You are to mix it all together and top it with a Korean chili sauce, kind of a Korean catsup. She loved it but like me, she didn't care for the seaweed soup. And she gave me her Kim Chee which I am adddicted to.

After lunch we headed for a buggy and started perusing the aisles. We saw all kinds of interesting cooking ware, serving pieces, fancy chopstix, tea sets. They had strange brands of dish soap, facial concoctions, hair cream and oil.

I have never seen such a selection of meats and types of seafood and fish since Harry's Farmer's Market. Some were in tanks still swimming.

The spices, herbs and exotic produce were enticing too. A lot of items were in different languages so I didn't even know what they were. 

All in all, it was a good day. I am back home and Elmo is not liking that I am blogging and not sitting with him so I guess I will call it a day.

Blessings to you all!

Friday, January 14, 2011

Free at last!

This week has been wonderful...an unexpected staycation, because of the snow and ice. Although Jim and Katie have been navigating the roads, there are still a lot of rough patches to watch out for.

Today, we ventured out to Mass at St. Catherine of Siena. It was so good to be in the presence of the Lord again and to receive Holy Communion. I didn't realize how much I missed it for those 4 days. Since the school is closed, the nuns were in attendance.

We have a lot of grocery shopping to do today and I hope that Aldi is open. Being very frugal, we make a lot of our purchases there. They don't carry everything that we want, but have most of what we need. And I am in a cooking mood today. Hmmmm....what should I make? I saw a recipe for Greek meatballs that is served over pasta. Maybe I'll make that. Still need that comfort food in this cold weather. Diet will come next week. LOL

Thursday, January 13, 2011

Chicken Pot Pie

This is day 4 of our being snowed in. Some brave souls are venturing out, but it is still hazardous because of the ice.
After reading this morning, another Catherine Cookson novel, I spent time edited a couple of photos for the Skinny Mini Ecourse offered by Kim Klassen. I conferred with my good buddy, Betty, AKA, Hootnonny, since she is also taking the class. We were on speaker phone when my husband came back from Costco with a rotisserie chicken. She heard him and asked me what i was going to do with it. I was thinking maybe I would make a chicken pot pie. She gave me a quick recipe that her mother used to make. And this is how I think I will do it:

♥ The 3 key ingredients that she gave me:
          1 cup of milk
          1 cup of melted butter( how can you go wrong)
          1 cup of self-rising flour

♥Mix all of these together and pour over:
          (in a pie pan) chopped, cooked carrots, celery, onion, peas and potato. I am just going to estimate how much of each vegetable. This mixture is supposed to add its own crust. I can't wait to try it! Here I go. See ya' later! Have a blessed day!

**** Flash update! I forgot to get the oven temp and time and since my friend is not feeling well, I just decided to set the oven to 375 degrees and leave the pie in there for 45 minutes. I will update and let you know how it turned out tomorrow.

Wednesday, January 12, 2011

Bean Days Recipe

This is the third day that we have been gleefully housebound. We have enough food stocked in our pantry...we just have to use a little imagination. After Katie saw that I had made a lentil soup, she decided to try a recipe that we found in the AJC newspaper for
Chickpea Burgers. I am paraphrasing C.W. Cameron's recipe in the "What's For Dinner" section.

Now I have to tell you, my daughter is an athlete. She is a runner, sometimes running up to 15 miles a day. So she is very careful of what she eats. Rarely eating red meat, she mostly concentrates on chicken and fresh vegetables and fruit. This recipe spoke to her.

Here are the ingredients:

3 slices of whole wheat bread, divided
1 15 oz. can  chickpeas, drained and rinsed
4 green onions, trimmed
1 ( 1 inch) piece of fresh ginger, peeled
1 large egg or 1/2 cup of Egg Beaters


15 oz can of chickpeas


Drain and Rinse


Make 3 pieces of toast
 ♥ Toast 1 slice of bread and place in a food processor bowl. Pulse until you have bread crumbs. Put in a wide bowl or plate and set aside.


Process one slice of toast until you get coarse bread crumbs


Our bread crumbs (sorry it is out of focus)

 
Our green onions
  

Since it is sometimes hard to get fresh ginger, I keep mine in the freezer. It is easy to grate when frozen.


The healthy alternative to whole eggs


♥ Return bowl to food processor and add the peas, green onions, the two other pieces of toast, grated ginger, salt and pepper to taste. Process until roughly chopped... you don't want a paste, like you would with hoummous. Remove half of the mixture to medium sized bowl.


♥ Add egg or Egg Beaters to the remaining mix in the processor and process until smooth. Add to the reserved mixture and mix well.

♥ Form the mix into four or five 3/4 inch thick patties and cover lightly with reserved bread crumbs.

Coating with bread crumbs


We are almost done, two more to go!


♥ In a large skillet, heat 2 tablespoons of olive oil over high heat, adding the patties. Reduce the heat to medium and cook until lightly browned. Turn and brown the other side. About 5 minutes on the heat altogether. Serve hot.


Cooking away!


Voila! a chickpea burger!


Tuesday, January 11, 2011

Day after the Snow

Life is so sweet when there is a blanket of snow outside. We are still advised by the news media that we should not venture out onto the streets unless we have to. I love the serenity of this enforced homeboundness. It stirs up memories of when I was a child and we would get to stay home on days that it snowed. We loved our routine being upset, getting up late in the morning and having hot chocolate and playing games.

Today is a kind of day like that. Normally, I do not get up and make a big breakfast. But today, I got a hankering for pancakes, eggs and bacon. So, that is exactly what i made: Banana pecan pancakes, scrambled eggs with cheese and turkey bacon. Jim and Katie loved it and so did I.

The snow is not popular with everyone here though. My three dogs don't know what it is and they are trying to avoid going outside. Lola, especially, who is afraid of her own shadow, is really freaked out by the snow. She wants no part of it, even when picked up and placed on the snow. Poor thing starts shivering even with her jacket on. She will be happy when it melts.

Monday, January 10, 2011

Snow here in Georgia

Is there anything more magical than waking up to a winter wonderland of snow. It cleans everything that it touches with its sparkly cover.

We anticipated the storm all day yesterday eventhough the weather reports said that it would begin after 8 PM. Just like little kids, we kept looking out the window for signs of impending snow.

Jim made numerous trips outside to gather tinder and logs preparing for a long winter's night. News anchors advised  all to stay home and away from traveling on what would become treacherous road conditions. Those with hilly driveways, parked below on the street.

We left the back porch light on, so as to not miss the first flakes. Around 9PM, we were thrilled to see the snow start. We went to sleep dreaming of sugar plums. LOL Well it felt like Christmas.

Outside Dining

Thursday, January 6, 2011

How I edit my portraits - A Tutorial

After conferring with my good friend Betty, of Artistic Expressions Photography,
http://artisticexpressionsphotographync.blogspot.com/, I decide to make some revisions to this tutorial. She had some valid points in making my changes. Thank you, Betty.

Photography is my passion, but shooting portraits is my absolute favorite thing to do. There is so much you can capture in expressions. As they say, the eyes are the windows to the soul. So here is my approach. It is not for everyone. I have been criticised for processing too much. Although no one is perfect, I like to make them as perfect as I can. Who wants to have the realism of moles and warts? Not me. Anyway, isn't that why "Glamour Shots" is so popular?

I have two programs that I use to edit: Photoshop Elements 7 & 9.

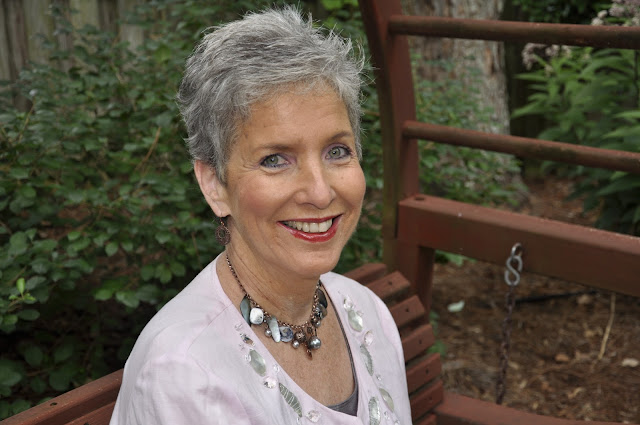
Below I have selected a photo of a friend, SOOC, ( straight out of camera).
The first thing that I do before anything else is to make sure that my exposure is what it is supposed to be. So even if I don't shoot RAW, I can still use the RAW dialog box by this method:
 Open your photo ( "Open As"), make sure that the file says "Raw". Then I make sure that the exposure is correct, usually I hit "auto". But there are times when you have to manually tweak it by moving the slider forward or backward until it looks correct to you.


 The next thing that I do is to lower the "Clarity". This gives you a head start on making the complexion like porcelain.
 There are other uses for opening up the RAW dialog box, but more on that in another post.


 Now we are going to have fun! We are going to get those eyes bright and beautiful!
Make a duplicate (Ctrl J) and take the zoom tool and zoom in very close to the eyes. Use the selection brush or any selection tool that you are comfortable with and set the pixels to a size that you are comfortable with.(Short cut: use the bracket keys to enlarge or reduce the size of your brush. Bracket keys are to the right of "P".
After you make your selections it should look like this:


Next we will put the selection of the eyes on their own layer by "Ctrl J" And it will appear like this:


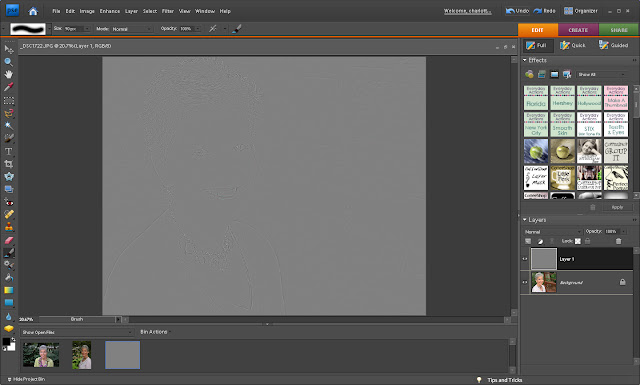
Go to the Filter Menu at the top >"Other">High Pass at 7.1 pixels> hit "Okay". Not to worry about how weird it looks at this point, we will fix it.


Go to the layers palette and click on the down arrow to open up the blending modes>select "Soft Light" or "Hard Light", whatever looks best to you. If the effect is too much for you, you can always reduce the opacity. Flatten.


Most people have a little bit of red veining that takes away from the brightness of the eyes so we are going to fix that right now. Of course, make a duplicate of your background again: "Ctrl J". Take your zoom tool and fill your screen with one eye at a time. Using a soft white brush (shortcut, hit the "B" on your keyboard) and making sure that the tool is a brush and not the "Impressionist brush", set the pixels to about 25, opacity to 100; we will reduce it in a minute.Continue with the other eye. Try not to mess with anything outside the whites. Now zoom back a little so that you can see both eyes. It will look like this:


Before flattening the layers, go to the opacity above the layers palette and reduce it while looking at the eyes, until they look natural but don't show any imperfections. I will reduce mine to about 30%. Here is mine:


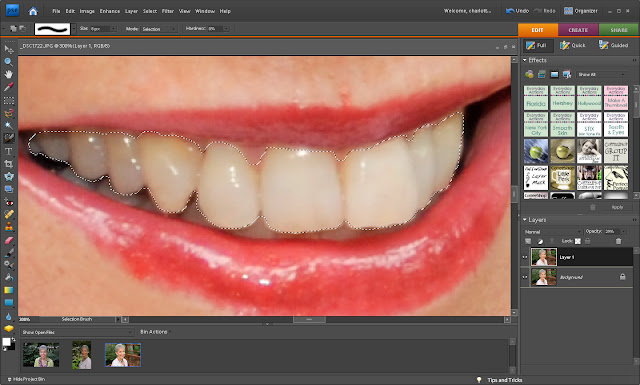
This lady has nice teeth, but I can't help whitening them just a touch. So here is what we are going to do: Make a selection around the teeth. This takes a little practise. Take your time. Remember that if you go over into the lip line, use the "alt" key and your selection brush to fix it. Her is how it will look:


Grab a white paint brush and brush all over the teeth. The selection lines will keep it in bounds.  I set my opacity at 29%, the same as the eyes. And it looks natural to me.This is what you will get:


"Ctrl D" to get rid of the marching ants. Then flatten.

Next, we are going to give her a "magic facial". Make a duplicate. Go to the filter menu>Blur>Gaussian Blur>12.0 radius. Hit "Okay". It will blur everything and look like this:


Next, you must hold down the "ctrl" key and the "create a new layer" icon and you will come up with a blank layer (looks checkered) between Layer 1 (top) and the background layer (bottom).
If at any time, you make a mistake, just go up to the "undo" key at the top of your page and start from that point.


Now, making sure that you have the top layer selected (Layer 1), hit "ctrl G". If you do this correctly (It took me a long time to get this right), your top layer should jump to the right a bit....like this:
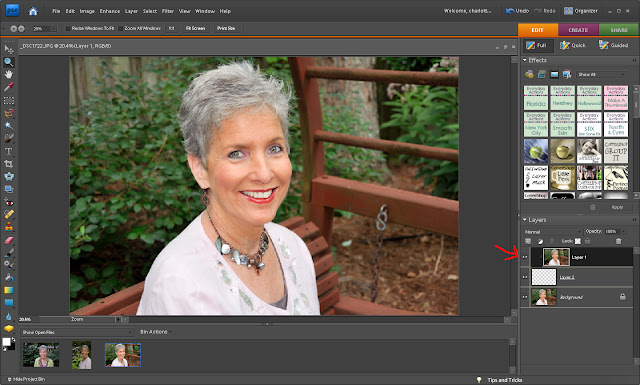

 
Notice how she is in focus again.

Now you are going to make the middle layer active by clicking on it (you can see that it is highlighted by a dark line around it). Grab a soft black brush, zoom into the face and start brushing carefully all the skin on the face, neck and sometimes arms. Do not touch the eyes, nostrils or the mouth, teeth, etc. You want those to be clear.

You will notice that while you are brushing away, that the checkered layer will get black, revealing the Gaussian blur layer and thus, softening the skin. Here is mine, partially done:


Now continue on all over the face, neck, chest and sometimes, the arms. Many people have sun damage that takes away from a perfect look and this Gaussian blur takes it away.
I wish I had some in my make-up drawer. Here is the finish of my brushing:


But, we are not finished yet. We need to back down the opacity so that we don't have a completely plastic look. We want her to look really good, not fake. I find that 63% works for me:


I am pleased with the processing thus far but this is when I will finalize by cropping and flattening:


Our final step will be to sharpen our photo, something I often forget to do. So you duplicate your photo, (ctrl J). Go to Filter>Other>High Pass>set radius to 2.8>click "okay". It will look weird like this:


Go to the blending modes above your palette and choose "soft light". You can click on the "eyeball" to see the before and after of the high pass sharpening. It is very slight.
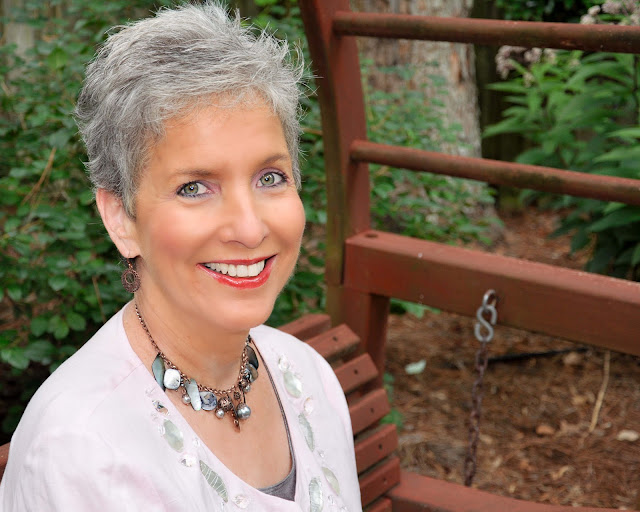
This is the final result:

Before
After

There you have it. I think I remembered everything. Hope you have fun with this tutorial. Once you get a little practice, it goes fast. This is what I do to clean up a portrait. When you have finished, you may want to add a texture or a special action to "jazz it up" even more. Cheers!


© Charlotte Wilson
CoffeeShop Designs